Now Reading: The T Square: Your Guide to Precision and Perfection
-
01
The T Square: Your Guide to Precision and Perfection
Have you ever tried to draw a perfectly straight line without a ruler? It’s nearly impossible. For centuries, artists, architects, and engineers have relied on simple yet powerful tools to bring their visions to life with accuracy. One of the most fundamental and recognizable of these tools is the t square. This simple, T-shaped instrument is a cornerstone of technical drawing, drafting, and woodworking, providing the foundation for straight, parallel, and perpendicular lines.
This guide will explore everything you need to know about the t square. We will delve into its history, examine the different types available, and learn how to use it effectively. Whether you are a student just starting in a design class, a hobbyist woodworker, or simply curious about this essential tool, you’ll find valuable insights here. We will cover its parts, how to choose the right one for your needs, and some handy tips to keep it in great condition.
Key Takeaways
- A t square is a technical drawing instrument used to draw horizontal lines and to align other drawing tools.
- It consists of two main parts: the long, straight “blade” and the shorter “head” or “stock” fixed at a perfect 90-degree angle.
- There are various types, including fixed head, adjustable head, and folding models, each suited for different tasks.
- Proper use involves holding the head firmly against the edge of a drawing board to ensure all lines drawn along the blade are parallel.
- Regular maintenance, such as cleaning and proper storage, is crucial for maintaining the accuracy and longevity of a t square.
- This tool is essential in fields like architecture, engineering, graphic design, and woodworking for ensuring precision.
What Exactly is a T Square?
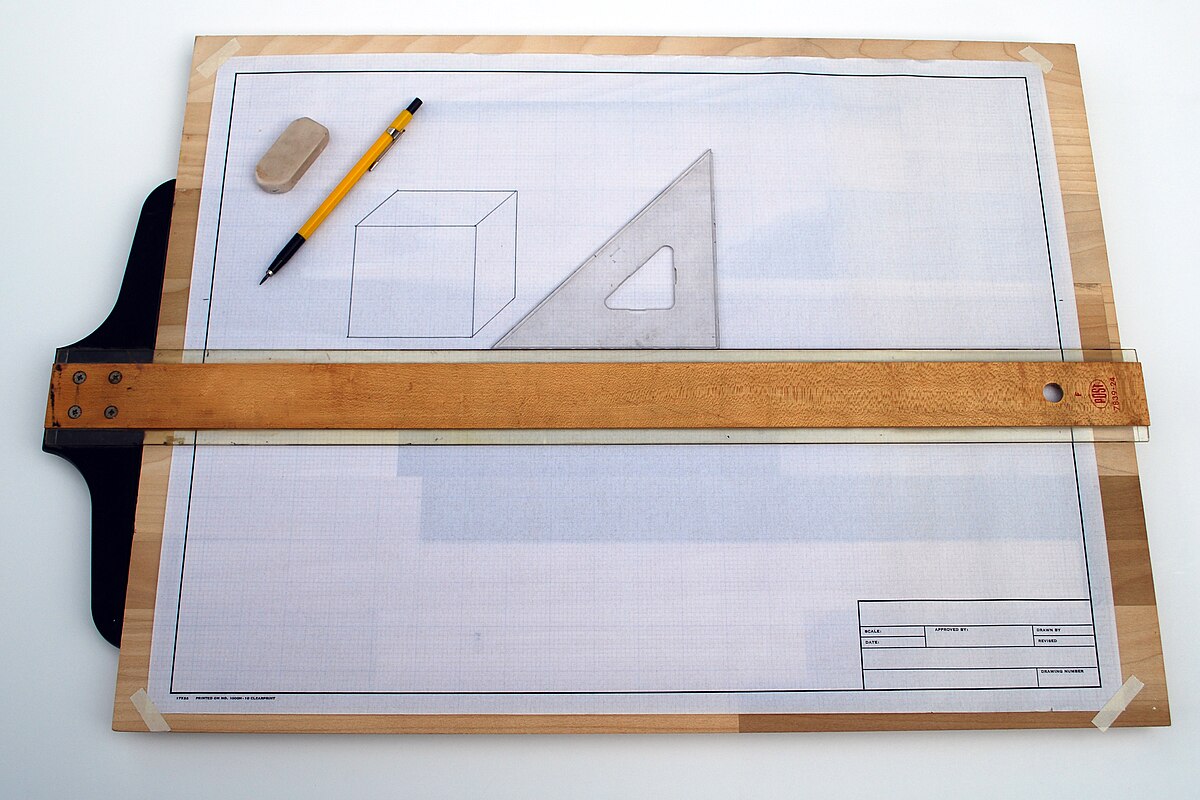
A t square is a drafting tool that gets its name from its distinctive “T” shape. It is designed to help you draw accurate horizontal lines on a flat surface, like a piece of paper on a drawing board. The tool is made of two main components that work together seamlessly. The first part is the long, flat ruler part called the blade. This is the edge you will use as a guide for your pencil or pen. The second part is the shorter piece attached at one end of the blade, known as the head or stock.
The head and the blade are joined at a precise 90-degree angle. This right angle is the key to how the tool works. When you’re using a drawing board or a drafting table, you rest the head of the t square against the straight side edge of the board. By sliding the head up and down along this edge, the blade remains perfectly horizontal across your drawing surface. This setup allows you to draw a series of parallel horizontal lines with ease and complete confidence in their straightness. It’s a simple but brilliant design that has been a staple in technical drawing for generations.
The History and Evolution of the T Square
The concept of using a guide for straight lines is ancient, but the t square as we know it became prominent with the rise of formal technical drawing and architecture. Before its invention, drafters used various straightedges, but achieving consistently parallel lines was difficult and time-consuming. The Industrial Revolution in the 18th and 19th centuries created a massive demand for detailed technical plans for machinery, buildings, and infrastructure. This need for precision and efficiency fueled the development of specialized drafting tools.
The t square emerged as a solution, providing a reliable method for creating the foundational grid of a technical drawing. Early versions were typically made from hardwoods like mahogany or pearwood, chosen for their stability and resistance to warping. The edges of the blades were often lined with ebony or celluloid for a smoother, more durable drawing edge.
As manufacturing processes improved, metals like steel and aluminum became more common, offering greater durability and precision. The 20th century saw the introduction of plastics and acrylics, which made the tools lighter, more affordable, and transparent, allowing the user to see the drawing underneath the blade. While digital design has replaced manual drafting in many industries, the t square remains a vital tool in educational settings and for traditional artists and craftspeople.
Anatomy of a T Square: Understanding its Parts
To use a t square effectively, it’s helpful to understand its basic components. While it’s a simple tool, each part has a specific function that contributes to its overall accuracy.
The Head (or Stock)
The head is the shorter, thicker part of the “T” shape. Its primary job is to act as a guide. You press the inner face of the head firmly against the edge of your drafting table or drawing board. This contact is what ensures the blade is positioned correctly. The head needs to be perfectly flat and straight to work properly. Some models have heads made of wood or plastic, while professional-grade tools often feature heavier, more robust heads to ensure they sit securely against the board’s edge.
The Blade
The blade is the long, ruler-like part of the t square. This is the working edge of the tool. You will draw your lines along the top edge of the blade. Blades are available in various lengths, typically ranging from 18 inches to 48 inches or even longer, to accommodate different paper and board sizes. The blade must be perfectly straight and have a smooth, clean edge to allow a pen or pencil to glide along it without snagging. Many modern blades are made of transparent acrylic or plastic, which is a great feature as it allows you to see the portion of the drawing directly beneath the blade. Some blades also include measurement markings, like a standard ruler, adding to their utility.
Different Types of T Squares
Not all T squares are created equal. Depending on the task at hand, you might need a specific type. They generally fall into a few main categories based on their construction and features.
1. Fixed Head T Square
This is the most common and basic type of t square. As the name suggests, the head is permanently fixed to the blade at a 90-degree angle. This design is simple, durable, and reliable for drawing parallel horizontal lines. It’s the standard choice for most drafting students and hobbyists because of its straightforward functionality and affordability. When you just need to create a grid of horizontal and vertical lines (using a set square in conjunction with it), the fixed head t square is the perfect tool for the job.
2. Adjustable Head T Square
An adjustable head t square, also known as a protractor head t square, offers more versatility. The head on this type can be pivoted and locked into place at various angles relative to the blade. This feature is incredibly useful for drawing consistent angled lines across a page without needing to constantly reposition a separate protractor or set square. Architects and engineers often favor this type when working on complex designs that involve repetitive non-horizontal lines, such as the pitch of a roof or angled structural supports.
3. Folding T Square
A folding t square is designed for portability. The blade is often hinged in the middle, allowing the tool to be folded in half. This makes it much easier to transport and store, especially for longer models that would otherwise be cumbersome. This is a great option for students or professionals who need to carry their tools between home, school, or the office. While convenient, it is important to ensure the hinge mechanism is high-quality and locks securely to maintain a perfectly straight edge when in use.
|
Tool Type |
Primary Use |
Main Advantage |
Ideal User |
|---|---|---|---|
|
Fixed Head T Square |
Drawing parallel horizontal lines |
Simplicity and reliability |
Students, Hobbyists |
|
Adjustable Head T Square |
Drawing parallel lines at any angle |
High versatility |
Architects, Engineers |
|
Folding T Square |
General drafting on the go |
Portability and easy storage |
Students, Traveling Professionals |
How to Properly Use a T Square
Using a t square is simple, but precision comes from proper technique. Following these steps will ensure you get the best results every time.
Step 1: Set Up Your Drawing Surface
Your t square is only as accurate as the edge it rests against. You need a drafting table or a drawing board that has at least one perfectly straight, smooth edge. This will be your reference edge. Secure your paper to the board using drafting tape or clips, making sure it is positioned squarely on the surface.
Step 2: Position the T Square
Place the t square on your board with the head resting against your chosen reference edge. The blade should extend across your paper. Press the head firmly but gently against the board’s edge. Your non-drawing hand should hold the head in place to prevent it from slipping or tilting.
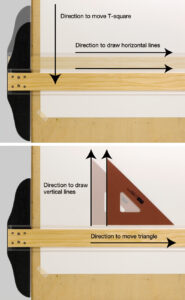
Step 3: Drawing Horizontal Lines
With the head held securely, you can now draw your horizontal lines. Place the tip of your pencil or pen against the top edge of the blade. Tilt the pencil slightly in the direction you are drawing and pull it smoothly across the page. To draw multiple parallel lines, simply slide the entire t square up or down your board to the desired position and repeat the process. The key is to keep the head in constant, firm contact with the board’s edge.
Step 4: Drawing Vertical Lines
A t square is primarily for horizontal lines, but it’s also the base for drawing vertical ones. To do this, you’ll need a set square or a drafting triangle. Place the t square in position as you would for a horizontal line. Then, rest the bottom edge of your set square on top of the t square’s blade. You can now draw a line along the vertical edge of the set square, and it will be perfectly perpendicular (at 90 degrees) to your horizontal lines.
Choosing the Right T Square for You
With several options available, selecting the right t square depends on your specific needs and budget. Here are a few factors to consider.
Material
- Wood: Traditional and aesthetically pleasing, but can be susceptible to warping from changes in humidity. Good for light use.
- Aluminum/Steel: Extremely durable, stable, and precise. A great choice for professionals who need a long-lasting tool. They can be heavier, which adds to stability.
- Plastic/Acrylic: Lightweight, affordable, and often transparent, which is a major advantage. These are excellent for students and general use. Ensure you choose a high-quality plastic that won’t easily nick or scratch.
Length
The length of the blade should be matched to the size of the paper you typically work with. The blade should be able to span the entire width of your drawing surface. A 24-inch t square is a good all-purpose size for most students working on standard-sized paper. If you work on larger architectural drawings, you might need a 36-inch, 42-inch, or even larger model.
Your Primary Projects
What will you be using the tool for? If you are a student learning basic drafting, a simple fixed head plastic or aluminum t square will be perfect. If you are an artist or illustrator, a transparent acrylic blade might be your best bet. For advanced architectural or engineering work that requires drawing many angled lines, investing in an adjustable head model will save you a lot of time and effort. Exploring resources and reviews on sites like Forbes Planet can also provide insights into what tools professionals in various fields are using.
Care and Maintenance Tips
A t square is a precision instrument, and taking good care of it will ensure it remains accurate for years.
- Keep it Clean: Wipe the blade and head regularly with a soft, clean cloth. Graphite, ink, and dirt can build up on the edges, which can smudge your drawings and affect accuracy. For stubborn grime, use a cloth lightly dampened with water and a mild detergent.
- Protect the Edges: The drawing edge of the blade is the most important part. Avoid knocking it against hard surfaces, as nicks and dents will ruin its straightness. Never use your t square as a cutting guide with a utility knife, as this will permanently damage the edge.
- Store it Properly: The best way to store a t square is to hang it vertically by the hole in the end of the blade. This prevents the blade from bowing or warping over time. If you can’t hang it, store it flat on a surface where it won’t be bent or have heavy objects placed on top of it.
- Check for Squareness: Periodically, you should check that the head and blade are still at a perfect 90-degree angle. Place the t square on a piece of paper and draw a line along the blade. Then, flip the tool over and draw a line in the same spot. If the two lines are perfectly parallel, your tool is accurate. If they diverge, your t square is out of square and may need to be adjusted or replaced.
The T Square in the Digital Age
In an era dominated by CAD (Computer-Aided Design) software, some might wonder if the t square is still relevant. While many professional industries have shifted to digital drafting, the t square continues to hold its ground. It remains an indispensable teaching tool in high schools and universities for introducing students to the fundamental principles of drafting, precision, and spatial reasoning.
Furthermore, many artists, designers, and craftspeople still prefer the hands-on, tactile experience of manual drawing. For them, a t square is not just a tool but a direct extension of their creative process. In woodworking and other crafts, it is used for layout and marking on materials, where a digital tool simply can’t replace it. So, while its role has evolved, the t square is far from obsolete. It has secured its place as both a foundational educational instrument and a cherished tool for traditional artisans.
Conclusion
The t square is a perfect example of timeless design—simple, effective, and indispensable. From its crucial role in the precise blueprints that built our modern world to its place in the classroom and art studio today, this humble tool has empowered creators to draw the line between idea and reality. Understanding its parts, functions, and proper use allows anyone to achieve a level of precision that is fundamental to good design and craftsmanship.
Whether you are drafting the next great architectural wonder, sketching a new product idea, or simply enjoying the satisfaction of a perfectly straight line, the t square is a reliable partner. By choosing the right one for your needs and taking good care of it, you will have a tool that serves you well on countless projects to come.
Frequently Asked Questions (FAQ)
Q1: Can I use a regular ruler instead of a t square?
You can use a ruler to draw straight lines, but you cannot guarantee they will be parallel to each other. The unique design of a t square, with its head resting against a straight edge, is what allows you to draw multiple, perfectly parallel horizontal lines with speed and accuracy.
Q2: What is the best material for a t square?
The “best” material depends on your use. For students and general use, a transparent acrylic t square is excellent because it’s lightweight, affordable, and allows you to see your work. For professional, heavy-duty use, a steel or aluminum model offers the best durability and stability.
Q3: How do I draw a vertical line with a t square?
You use a t square in combination with a set square (drafting triangle). First, you set up the t square to draw a horizontal line. Then, you place the bottom of the triangle firmly against the top edge of the t square’s blade. You can then draw a line along the vertical edge of the triangle, which will be perfectly perpendicular to the t square’s edge.
Q4: My t square seems to be inaccurate. How can I fix it?
First, check its accuracy by drawing a line, flipping the tool over, and drawing another line over the first. If they don’t match, your tool is “out of square.” On a fixed head t square, this is difficult to fix and it may need to be replaced. On an adjustable model, you may be able to recalibrate the head to a true 90-degree angle using the adjustment screws.
Q5: Why is my t square smudging my drawings?
Smudging is usually caused by graphite or dirt building up on the underside and edge of the blade. Clean your t square regularly with a soft cloth. You can also try “floating” the blade slightly by taping a couple of coins to the underside, which lifts the drawing edge just off the paper to prevent smearing.
Stay Informed With the Latest & Most Important News
Previous Post
Next Post


Advertisement