Now Reading: A Beginner’s Guide to Mindful Drawing with Zentangle Patterns
-
01
A Beginner’s Guide to Mindful Drawing with Zentangle Patterns
Have you ever wanted a simple, relaxing way to be creative, even if you think you can’t draw? The Zentangle Method might be just what you’re looking for. It involves creating beautiful images by drawing structured, repetitive patterns. These designs, known as zentangle patterns, are easy to learn and offer a wonderful way to practice mindfulness and reduce stress. You don’t need to be an artist to start. All you need is a pen, a piece of paper, and a willingness to explore your creativity one stroke at a time. This guide will walk you through everything you need to know to begin your journey with this fascinating art form.
Key Takeaways
- Zentangle is a meditative art form using structured patterns to create abstract art.
- The core supplies are simple: a pen, a pencil, and a small paper square called a “tile.”
- Learning basic zentangle patterns, called “tangles,” is the first step for any beginner.
- This practice is known for its ability to promote relaxation, improve focus, and reduce stress.
- Anyone can create beautiful Zentangle art, regardless of their perceived artistic skill.
What Exactly is the Zentangle Method?
The Zentangle Method is more than just doodling; it’s a specific and structured form of artistic meditation. Created by Rick Roberts and Maria Thomas, it provides an easy-to-learn way to create stunning abstract art using simple, repeated strokes. The process is just as important as the final outcome. Each piece is created on a small 3.5-inch square of paper, known as a “tile.” The method encourages you to focus on each single stroke of your pen without worrying about what the final picture will look like. This mindful approach helps you enter a relaxed, focused state, similar to meditation. You don’t need a grand plan or an artistic vision. By breaking down complex-looking designs into simple, manageable zentangle patterns, the method makes art accessible to everyone.
The Essential Supplies for Getting Started
One of the best things about Zentangle art is its simplicity. You don’t need a fancy studio or expensive materials to begin your practice. The official Zentangle kit includes specific high-quality supplies, but you can easily start with items you likely already have around the house. The focus is on the process, not the prestige of your tools. At its core, you only need three things: a pen for drawing the tangles, a pencil for creating strings and shading, and a piece of paper. The traditional paper is a 3.5-inch square tile, but any small piece of quality paper will do. The small size makes the project feel achievable and less intimidating than a large, blank canvas, allowing you to complete a piece in a single sitting.
Your Basic Toolkit
- A Fine-Tipped Pen: A black Micron pen (like a 01 size) is the standard choice because its ink is permanent and won’t smudge. However, any fine-tipped black pen you feel comfortable with will work perfectly.
- A Graphite Pencil: A regular HB pencil is used to draw a light “string” on your tile, which creates sections to fill with zentangle patterns. It’s also essential for adding shading later, which brings depth and dimension to your finished art.
- Paper “Tiles”: While official Zentangle tiles are made from high-quality cotton paper, you can start with any thick cardstock or art paper cut into a small square. The texture should be smooth enough for your pen to glide easily.
- A Tortillon (Optional): This is a small, rolled paper stump used for blending the graphite shading. You can also use your fingertip or a cotton swab to achieve a similar effect.
Understanding the First Steps of Zentangle
Getting started with your first Zentangle tile involves a simple, ritual-like process. The method is broken down into a few easy-to-follow steps that guide you from a blank piece of paper to a finished piece of art. This structure is designed to be calming and to remove the pressure of decision-making, allowing you to immerse yourself in the creative flow. The process begins with gratitude and appreciation, setting a mindful tone for the session. From there, you prepare your tile with corners and a border, then divide the space with a light pencil “string.” This string is not a plan but a guide, creating interesting areas to fill with the zentangle patterns you choose.
The Eight Steps of the Zentangle Method
- Gratitude and Appreciation: Take a moment to appreciate your tools, your time, and the opportunity to create.
- Corner Dots: Use your pencil to place a light dot in each of the four corners of your tile.
- Border: Connect the dots with light, straight or slightly curved pencil lines to create a border.
- String: Draw a light, simple pencil line or series of lines that divide the area inside your border into sections. This “string” can be a simple curve, a Z-shape, or any other freeform line.
- Tangle: Now, switch to your pen. Begin drawing your chosen zentangle patterns, or “tangles,” inside the sections created by your string. Focus on one stroke at a time.
- Shading: Once you’ve filled the sections with tangles, use your pencil to add graphite for shading. This is where your art truly comes to life, gaining depth and a three-dimensional look.
- Initial and Sign: Sign your work. On the front, artists often place a unique monogram or “chop.” On the back, you can sign and date your creation.
- Appreciate Again: Hold your tile at arm’s length, turn it, and admire what you’ve created from different angles.
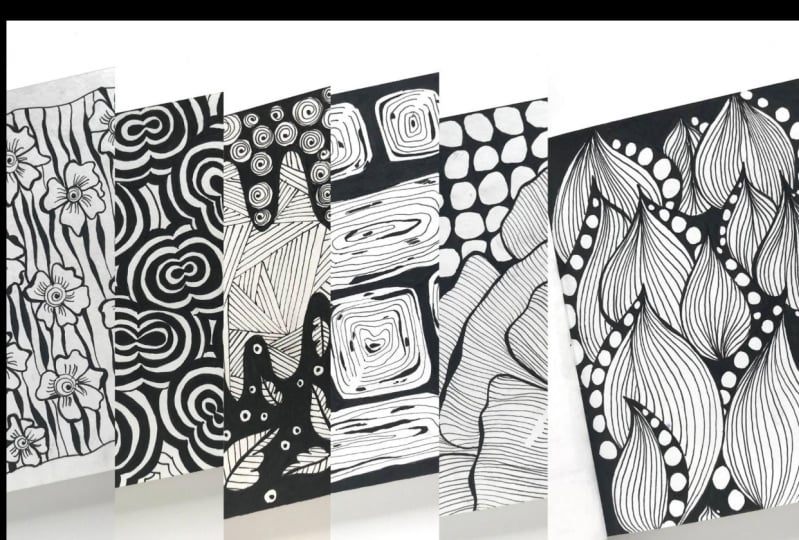
Your First Basic Zentangle Patterns to Master
Every Zentangle artist starts with the basics. These foundational zentangle patterns, often called “official tangles,” are designed to be simple to learn and draw. They are the building blocks for more complex compositions. Learning a few of these will give you the confidence to start filling your tiles. Patterns like Crescent Moon, Hollibaugh, Printemps, and Cadent are excellent starting points. Crescent Moon involves drawing a series of auras (lines that echo a shape) around solid semi-circles. Hollibaugh creates the illusion of overlapping beams or ribbons. Printemps is a simple, energetic spiral. Each of these patterns uses basic strokes—dots, lines, curves, and orbs—that anyone can draw. Practicing these will build your muscle memory and your pattern library.
Exploring More Beginner Patterns
As you get comfortable with the initial set of tangles, you can expand your repertoire. The key is to choose patterns that feel intuitive and enjoyable to you. Some other fantastic beginner zentangle patterns include Florz, which fills a space with simple grid-based circles, and Bales, which looks like rows of wheat or seeds. The pattern Static is perfect for filling backgrounds with what looks like textured noise, and it’s incredibly forgiving. As you practice, you’ll discover how different tangles look next to each other and how they interact within the sections of your string. Don’t be afraid to experiment. Remember the Zentangle motto: “No mistakes.” Every line is an opportunity, and unexpected strokes can lead to new and beautiful designs.
Advancing to Intermediate Tangles
Once you have a solid grasp of the foundational strokes and a handful of basic zentangle patterns, you can start exploring more intricate designs. Intermediate tangles often involve more steps, layering, or nuanced shading to achieve their effect. These patterns may require a bit more focus but are built upon the same simple strokes you already know. For example, a pattern might combine grid-based drawing with flowing organic lines, or it might challenge you to create illusions of depth and transparency. Moving on to these more complex tangles is a natural progression that keeps the practice engaging and exciting. You’ll start to see how patterns can be deconstructed and even begin to develop your own unique variations.
|
Feature |
Basic Zentangle Patterns |
Intermediate Zentangle Patterns |
|---|---|---|
|
Complexity |
Simple, few steps (e.g., 2-4 steps). |
More complex, multiple steps (e.g., 5-8+ steps). |
|
Strokes Used |
Primarily uses dots, lines, curves, and orbs. |
Combines basic strokes with advanced techniques like layering and interwoven lines. |
|
Shading |
Simple shading to add basic depth. |
More nuanced shading is required to create effects like transparency or dimension. |
|
Common Examples |
Crescent Moon, Printemps, Hollibaugh. |
Mooka, Paradox, Indy-Rella. |
The Beauty of ‘Tangleations’
A “tangleation” is a term used in the Zentangle community for a variation of an existing official tangle. This is where your personal creativity really begins to shine. After you’ve mastered a basic pattern, you can start to alter it. What happens if you draw it larger? What if you use curved lines instead of straight ones? Or what if you add dots or circles inside one of the elements? For example, the simple grid pattern Florz can be transformed by changing the shape you draw inside each grid square. This practice of creating tangleations is highly encouraged. It shows you understand the underlying structure of zentangle patterns and empowers you to make them your own. It’s a fun way to push your boundaries and discover new creative possibilities within the Zentangle framework.
An Example Tangleation: Modifying Printemps
Let’s consider the beginner tangle Printemps, which is a simple spiral. A basic tangleation could involve starting the spiral but then adding “sparkle” marks or dots at the end of the line. Another variation could be to draw several Printemps spirals and have their tails connect and weave around each other. You could also try filling a section with spirals of different sizes, from very large to tiny, creating a sense of depth and movement. By simply asking “What if…?” you can turn one basic pattern into an endless source of new designs. This exploration is at the heart of the Zentangle Method’s philosophy of creative freedom within a structured system.
The Meditative Benefits of Drawing Zentangle Patterns
The Zentangle Method is often described as “yoga for the brain,” and for good reason. The deliberate, repetitive nature of drawing zentangle patterns can induce a state of relaxed focus. By concentrating on each deliberate stroke of the pen, your mind is drawn away from daily worries and distractions. This focused attention on a simple, creative task helps quiet the internal chatter that so often contributes to stress and anxiety. The process doesn’t require you to think ahead or plan an outcome, which frees you from the pressure of perfection. As you become absorbed in the rhythm of your drawing, your breathing may slow, your muscles may relax, and you can experience a profound sense of calm. It’s a form of active mindfulness that is both accessible and deeply rewarding.
How Zentangle Enhances Focus and Creativity
Practicing the Zentangle Method regularly can have a positive impact beyond just the time you spend drawing. The focus required to create intricate zentangle patterns can translate into improved concentration in other areas of your life. It trains your brain to pay attention to details and stay on task. Furthermore, by providing a structured framework for creativity, it helps break down the fear of the blank page. The method shows you that complex beauty can be achieved through simple, manageable steps. This can boost your creative confidence, encouraging you to tackle other artistic or problem-solving challenges. Many people find that after a Zentangle session, they feel more centered, refreshed, and better equipped to handle cognitive tasks with a clear and open mind.
Incorporating Zentangle Into Your Daily Routine
Finding time for a new practice can be challenging, but the beauty of Zentangle art is its flexibility. A complete tile can be finished in as little as 15 to 20 minutes, making it easy to fit into a busy schedule. You could make it a morning ritual to start your day with a moment of calm focus, or use it as a way to decompress after work. Some people enjoy drawing during their lunch break as a mental reset. You don’t even need to complete a full tile in one sitting. You can work on your zentangle patterns for just a few minutes whenever you need a quick break. The portable nature of the supplies means you can practice anywhere—while waiting for an appointment, traveling, or simply sitting in a park.
Sharing Your Art with the Zentangle Community
One of the most rewarding aspects of the Zentangle journey is connecting with others who share your passion. There is a large and welcoming global community of Zentangle artists. You can find them on social media platforms like Instagram and Pinterest by searching for hashtags like #zentangle or #zentangleart. There are also numerous blogs, forums, and online groups dedicated to sharing creations, offering tips, and participating in challenges. If you’re looking for more inspiration or structured learning, you can explore resources and galleries from artists around the world; for example, you can find a variety of creative content at https://forbesplanet.co.uk/. Sharing your work, seeing what others create, and exchanging ideas can be incredibly inspiring and motivating as you continue to develop your skills with zentangle patterns.
Conclusion
The Zentangle Method offers a unique and powerful blend of creativity and mindfulness that is accessible to everyone. By focusing on the simple, deliberate process of drawing structured zentangle patterns, you can unlock a state of calm focus, reduce stress, and create beautiful, intricate art without any prior experience. It’s a practice that celebrates the journey, reminding us that there are no mistakes, only opportunities. Whether you are seeking a new creative outlet, a tool for relaxation, or simply a way to unplug and recenter, Zentangle provides a simple path. Grab a pen, a piece of paper, and start your first tile today. You may be surprised by the beautiful places your creativity can take you.
Frequently Asked Questions (FAQ)
1. Do I need to be an artist to do Zentangle?
No, absolutely not. The Zentangle Method was specifically designed for people of all skill levels, especially those who believe they can’t draw. It uses simple, structured patterns that anyone can learn one stroke at a time.
2. What is the difference between Zentangle and doodling?
While both can be relaxing, the Zentangle Method is a structured process with specific steps and named patterns called “tangles.” Doodling is typically more freeform and spontaneous. Zentangle is done with intention and focus on a small “tile” to create a finished piece of abstract art.
3. How long does it take to complete a Zentangle tile?
A standard 3.5-inch tile can typically be completed in 15 to 30 minutes, making it a perfect activity for a short break. However, there’s no time limit; you can take as much or as little time as you like.
4. What does the term “tangle” mean?
In the Zentangle world, a “tangle” is the noun used for a specific, deconstructed Zentangle pattern. The verb “to tangle” means the action of drawing that pattern.
5. Can I use color in my Zentangle art?
The traditional Zentangle Method is done in black and white with graphite shading. However, many artists enjoy adding color to their work after the tangles are complete. This is known as Zentangle Inspired Art (ZIA).
6. Where can I find more zentangle patterns to learn?
There are many resources available. You can find official tangles on the Zentangle website, in books by Certified Zentangle Teachers (CZTs), and through countless tutorials on platforms like Pinterest and YouTube.
Stay Informed With the Latest & Most Important News
Previous Post
Next Post


Advertisement